
Drawing Libraries
Enhanced drawing library with quantizing, dithering and many other features.
Highlights
Advanced Icon Handling
Adding images to icons, extracting icon images, converting to multi-resolution bitmap, advanced save support.
Advanced Bitmap Handling
Quantizing and dithering, changing color depth and size, fast direct bitmap access, advanced save support to different formats.
Shape Drawing
Drawing and filling shapes into bitmaps of any pixel format with feature-rich brushes, pens and other drawing options.
Free
The project is open source and is available on GitHub. Being under a custom permissive license the Drawing Libraries are free to use even in commercial projects.
Fully Documented
Online documentation with many examples and sample images.
Proven
Used by developer companies such as Siemens and evosoft for more than a decade.
Download
Available Packages
Starting with version 7.0.0 KGy SOFT Drawing Libraries are available in multiple packages:
Source Code
The source is available on GitHub.
Application Examples
KGy SOFT Drawing Example Applications
The Examples folder of the GitHub repository contains several example applications for using KGy SOFT Drawing Libraries in various environments.
The available example applications:
- MAUI: uses just the core package, implementing special support for the
SKBitmaptype. - SkiaSharp/MAUI: uses the dedicated package for SkiaSharp.
- UWP: uses the dedicated package for UWP.
- WinForms: uses the dedicated package for GDI+.
- WinUI: uses the dedicated package for WinUI.
- WPF: uses the dedicated package for WPF.
- SkiaSharp/WPF: uses the dedicated package for SkiaSharp.
- Xamarin: uses just the core package, implementing special support for the
SKBitmaptype.
See the Examples folder for all of the example applications.
ScreenToGif
ScreenToGif is a WPF desktop application that can be used to create and save animations. Among others, it can use KGy SOFT Drawing Libraries to save GIF animations using various quantizers and ditherers.

KGy SOFT Imaging Tools and Debugger Visualizers
KGy SOFT Imaging Tools is a desktop application in the KGySoft.Drawing.Tools repository, which nicely demonstrates a sort of features of Drawing Libraries, such as quantizing and dithering, resizing, adjusting brightness, contrast and gamma, etc. The tool is packed also with some debugger visualizers for several System.Drawing, WPF, SkiaSharp and KGySoft types including Bitmap, Metafile, Icon, Graphics, WriteableBitmap, SKBitmap and more.
If you use Visual Studio 2013 or newer the simplest way is to download the installer package from the VisualStudio Marketplace.
Otherwise, you can download the binaries for other versions from the GitHub repo.
Help
Browse the online documentation for examples and detailed descriptions.
Examples
Fast Bitmap Manipulation
Managed Bitmap Data Manipulation
3rd Party Bitmap Types Support
Supporting Custom Pixel Formats
Shape Drawing
KGy SOFT Drawing Libraries offer several extension methods for drawing shapes on bitmaps. It does not matter if you are using a managed bitmap data, a GDI+ Bitmap, WriteableBitmap, SKBitmap or any other bitmap type, the result will be the same for the same pixel formats. Even indexed formats are supported, which usually isn’t the case for the native built-in drawing methods of the bitmap types. You can use several brushes and pens to draw or fill shapes with different colors and patterns, and you can use the DrawingOptions to specify several parameters, such as the quality of the rendering, or even quantizing and dithering.
There are specific methods for drawing rectangles, ellipses, lines, polygons, Bézier-curves, arcs, pies and rounded rectangles, and you can specify paths for more complex compound shapes. The drawing methods are available as extension methods for the IReadWriteBitmapData interface (both in sync and async flavors), so you can use them with any bitmap type mentioned above.
The following example demonstrates the possible shape drawing approaches with ellipse drawing:
// Using a managed bitmap here, but you can also use the GetReadWriteBitmapData
// extension method of the specific libraries.
using var bitmap = BitmapDataFactory.CreateBitmapData(64, 64, KnownPixelFormat.Format32bppArgb);

// Drawing a filled ellipse with an implicit solid brush:
bitmap.FillEllipse(Color.Red, new Rectangle(8, 8, 48, 48));

// Drawing a filled ellipse with an explicit brush:
bitmap.FillEllipse(Brush.CreateSolid(Color.Yellow), new Rectangle(20, 20, 24, 24));

// Drawing an outlined ellipse with an implicit solid 1 pixel wide pen:
bitmap.DrawEllipse(Color.Green, new Rectangle(16, 16, 32, 32));

// Drawing an outlined ellipse with an explicit pen:
bitmap.DrawEllipse(new Pen(Color.Blue, 2f), new Rectangle(24, 24, 16, 16));

// Similar as above, but asynchronously:
await bitmap.FillEllipseAsync(Color.Red, new Rectangle(8, 8, 48, 48));
For more complex shapes you can use the Path class to define a sequence of lines, curves, and other shapes. As it allows caching the path region, you may want to use it also for simple shapes if you plan to draw them multiple times.
The following example demonstrates how to use the Path class:
// It supports flow syntax, so you could even inline it into a Draw/FillPath call:
var path = new Path(false)
    .TransformTranslation(1, 1)
    .AddPolygon(new(50, 0), new(79, 90), new(2, 35), new(97, 35), new(21, 90))
    .AddEllipse(0, 0, 100, 100)
    .AddRoundedRectangle(0, 0, 100, 100, cornerRadius: 10);

// Calculating the required size of the bitmap, adding symmetric padding:
var bounds = path.Bounds;
var size = bounds.Size + new Size(bounds.Location) * 2;

// Or: GetReadWriteBitmapData for a GDI+ bitmap, WPF WriteableBitmap, SKBitmap, etc.
using var bitmapData = BitmapDataFactory.CreateBitmapData(size);
bitmapData.Clear(Color.Cyan);

// Using implicit 1 pixel width solid pen and default drawing options:
bitmapData.DrawPath(Color.Blue, path);
The examples above didn’t specify any drawing options, so the default values were used. The DrawingOptions class allows you to specify several parameters for the drawing methods, such as anti-aliasing, alpha blending, fill mode, special handling for drawing thin lines, pixel offset for scanning filled regions and drawing paths, and even quantizing and dithering.
The following table demonstrates a few examples of the different drawing options:
FillMode = ShapeFillMode.Alternate (default): When scanning the region of a polygon to be filled, a point is considered to be the part of the polygon if the scanline crosses odd number of lines before reaching the point to be drawn, and is considered not to be the part of the polygon if the scanline crosses even number of lines. This strategy is faster than the NonZero mode, though it may produce “holes” when a polygon has self-crossing lines.

FillMode = ShapeFillMode.NonZero: It considers the direction of the path segments at each intersection, adding/subtracting one at every clockwise/counterclockwise intersection. The point is considered to be the part of the polygon if the sum is not zero.

AntiAliasing = false, FastThinLines = true (default): When anti-aliasing is disabled, 1 pixel width paths are drawn in a special way, optimized for performance and accuracy.

AntiAliasing = false, FastThinLines = false: With disabled FastThinLines the 1 pixel width paths are drawn with the same algorithm as wider ones, which may cause a bit jagged appearance.

AntiAliasing = true: When anti-aliasing is enabled, the edges of the shapes are smoothed by blending the colors of the shape and the background.

AlphaBlending = true (default): Possible alpha pixels are blended with the background. The used color space depends on the WorkingColorSpace of the target bitmap data. In this example the shape is drawn with solid brush, using blue color with 50% transparency, and the bitmap has linear working color space.

AlphaBlending = false: Turns off alpha blending. Unless drawing on a transparent background, it’s not recommended to combine disabled alpha blending with anti-aliasing, because unexpected alpha pixels may appear at the edges of the shapes. In the example image the brush uses transparent color, which ‘cuts’ a transparent ‘hole’ in the image.

ScanPathPixelOffset = PixelOffset.None, AntiAliasing = false: When filling shapes, the scanning of edges occurs at the top of the pixels. The shape in the example has integer coordinates, the top edge is descending, whereas the bottom is ascending 1 pixel from the left to the right. The example is enlarged to show the effect.
ScanPathPixelOffset = PixelOffset.Half, AntiAliasing = false (default): The scanning of edges occurs at the center of the pixels. The shape is the same as above. The example is enlarged to show the effect.
ScanPathPixelOffset = PixelOffset.None, AntiAliasing = true: When filling shapes, the scanning of edges occurs at the top of the subpixels. When anti-aliasing is enabled, ScanPixelOffset makes a much less noticeable difference, though the gradients of the top and bottom lines are a bit different. The example is enlarged to show the effect.
ScanPathPixelOffset = PixelOffset.Half, AntiAliasing = true: The scanning of edges occurs at the center of the subpixels. The result is almost the same as above, though the gradients of the top and bottom lines are more symmetric. The example is enlarged to show the effect.
DrawPathPixelOffset = PixelOffset.None (default): When drawing paths, the point coordinates are not adjusted before applying the pen width. When AntiAliasing is true, for polygons with every point at integer coordinates, this causes blurry horizontal and vertical lines for odd pen widths and sharp ones for even pen widths. The left rectangle was drawn with a 1 pixel wide pen, and the right one with a 2 pixel wide pen.
DrawPathPixelOffset = PixelOffset.Half: The point coordinates are shifted by a half pixel right and down before applying the pen width. When AntiAliasing is true, for polygons with every point at integer coordinates, this causes sharp horizontal and vertical lines for odd pen widths and blurry ones for even pen widths. The left rectangle was drawn with a 1 pixel wide pen, and the right one with a 2 pixel wide pen.
Quantizer and Ditherer: Specifying a quantizer allows drawing shapes with limited number of colors, whereas a ditherer can preserve the tone of the original colors. When drawing into a bitmap with indexed pixel format, quantizing is automatically applied to the colors of the palette. This example is a 1 bit-per-pixel bitmap, the background was cleared with cyan, and the polygon was filled with blue color, and both operation used interleaved gradient noise dithering.

Transformation: It allows specifying a transformation matrix for the drawing operation. The example demonstrates a simple rotation by 45 degrees from the center. Please note that if a Path is drawn multiple times with the same transformation, it’s generally recommended to apply the transformation to the Path directly rather than to the DrawingOptions, because the latter prevents the Path region from being cached.

The abstract Brush class has several Create... factory methods to create different types of brushes. The following table demonstrates a few examples:
Brush.CreateSolid: Creates a solid brush with a single color. Color32, Color64 and ColorF overloads are available, and you can also use the named Color members to cast them to Color32 implicitly. For example, Brush.CreateSolid(Color32.FromArgb(128, Color.Blue)) creates a blue solid brush with 50% transparency that can produce a similar result to the one in the image.
Brush.CreateLinearGradient: Creates a linear gradient brush. There are two groups of overloads: one for specifying a pair of start/end points optionally with a GradientWrapMode, and another one with an angle, which automatically stretches the gradient for the paths to fill.
The top image uses specific start/end points without repeating the gradient, whereas the bottom one just specified a zero angle to create a horizontal gradient. Note that in the bottom image the start/end points are automatically adjusted to the bounds of the shape in each fill sessions. Both examples filled a single elliptic path with three different translations.


Brush.CreateTexture: Creates a texture brush. A TextureMapMode can be specified, which allows tiling, stretching, centering and a few other modes.
The top image uses a texture with a map mode of tiling with mirroring on both axes, whereas the bottom one centers the same texture and uses no alpha blending, so where there is no texture pixel to set, the path region cuts a transparent hole in the image. Both examples filled a single elliptic path with three different translations.


The Pen class can be instantiated with a brush or a single color, and a width. Some other parameters, such as the start/end cap, the line join and the miter limit can be configured by the corresponding properties. The following table highlights a few properties:


StartCap and EndCap: Specify the style of the start and end points of an open figure. Can be Flat, Square, Round or Triangle. The example images demonstrate these cap types from the top to the bottom, using the same cap style at both ends. Please note that the only difference between Flat and Square styles is that the Flat style has the originally specified length, whereas the Square style extends the line by half of the pen width. All examples use a 10 pixel wide pen.


The basic Draw... and Fill... methods are synchronous, they automatically adjust the number of used threads, they cannot be canceled and they don’t report progress. The overloads with a ParallelConfig parameter are still synchronous, but they allow you to specify the number of threads to be used, and you can also specify a CancellationToken to cancel the operation. They also allow you to specify a progress handler to report the progress of the operation.
To draw shapes asynchronously, you can use the Draw...Async and Fill...Async methods on .NET Framework 4.0 or newer targets, or the old-fashioned BeginDraw.../EndDraw... and BeginFill.../EndFill... methods on every target starting with .NET Framework 3.5.
Color Correct Alpha Blending
Most pixel formats use the sRGB color space, in which alpha blending (and also other operations) may provide incorrect results.
By default it depends on the used pixel format which color space is used in KGy SOFT Drawing Libraries. The default pixel format in most rendering engines use some sRGB format (usually a premultiplied one), which is optimized for blending in the sRGB color space. When creating a managed bitmap data by the CreateBitmapData overloads or by the GetReadable/Writable/ReadWriteBitmapData methods of the specific libraries you can use the overloads that have a WorkingColorSpace parameter.
💡 Tip: See the
WorkingColorSpaceenumeration for more information and image examples about working in the sRGB and linear color spaces.
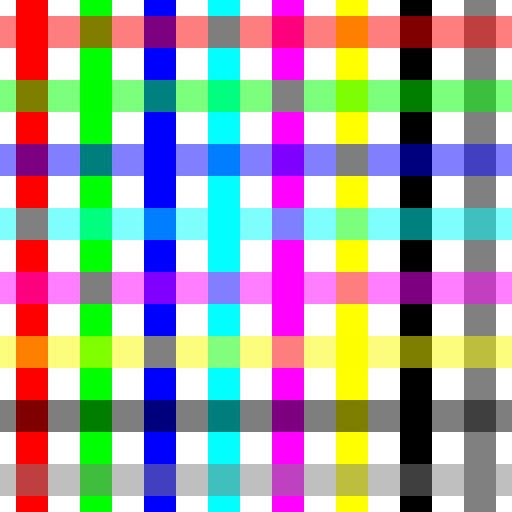
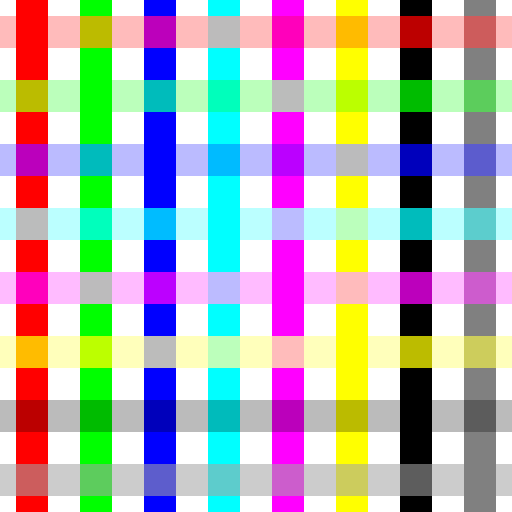
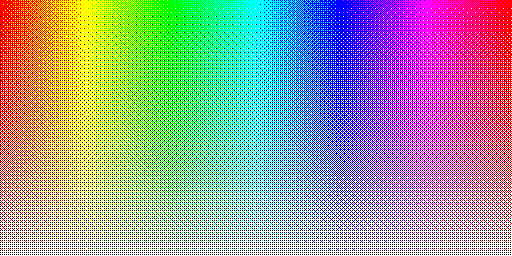
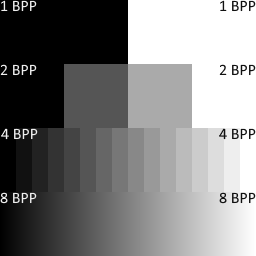
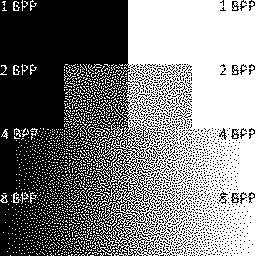
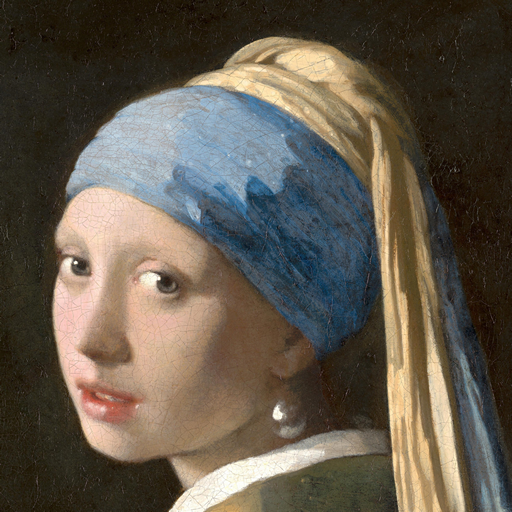
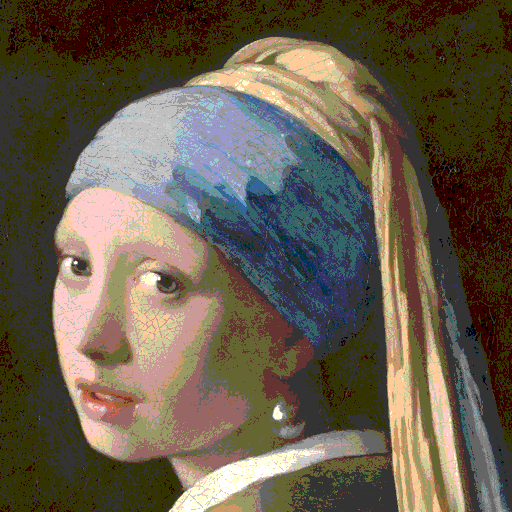
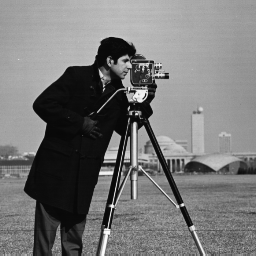
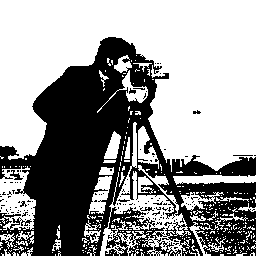
Quantizing and Dithering
KGy SOFT Drawing Libraries offer quantizing (reducing the number of colors of an image) and dithering (techniques for preserving the details of a quantized image) in several ways:
- The
ImageExtensions.ConvertPixelFormat/BitmapDataExtensions.Cloneextension methods return newBitmap/IReadWriteBitmapDatainstances as the result of the quantizing/dithering. - The
BitmapExtensions.Quantize/BitmapDataExtensions.QuantizeandBitmapExtensions.Dither/BitmapDataExtensions.Ditherextension methods modify the originalBitmap/IReadWriteBitmapDatainstance. - Some
ImageExtensions.DrawInto/BitmapDataExtensions.DrawIntooverloads can use quantizing and dithering when drawing different instances into each other. - Several further extension methods in the
BitmapExtensions/BitmapDataExtensionsclasses have anIDithererparameter.
💡 Tip:
- For built-in quantizers see the
PredefinedColorsQuantizerandOptimizedPaletteQuantizerclasses. See their members for code samples and image examples.- For built-in ditherers see the
OrderedDitherer,ErrorDiffusionDitherer,RandomNoiseDithererandInterleavedGradientNoiseDithererclasses. See their members for code samples and image examples.
See the following examples for the possible quantization results (click the images for displaying in full size):


Advanced GIF Encoder with High Color Support
The KGy SOFT Drawing Libraries make possible creating high quality GIF images and animations:
- For
Imagetypes the simplest and highest-level access is provided by theImageExtensionclass and itsSaveAs*methods. - Alternatively, you can use the static methods of the
GifEncoderclass to create animations or even high color still images. See also theAnimatedGifConfigurationclass. - To create a GIF image or animation completely manually you can instantiate the
GifEncoderclass that provides you the lowest-level access.

⚠️ Note: Please note that multi layered high color GIF images might be mistakenly rendered as animations by some decoders, including browsers. Still images do not contain the Netscape application extension and do not have any delays. Such images are processed properly by GDI+ on Windows, by the
System.Drawing.BitmapandImageclasses and applications relying on GDI+ decoders such as Windows Paint or KGy SOFT Imaging Tools.
License
This repository is under the KGy SOFT License 1.0, which is a permissive GPL-like license. It allows you to copy and redistribute the material in any medium or format for any purpose, even commercially. The only thing is not allowed is to distribute a modified material as yours: though you are free to change and re-use anything, do that by giving appropriate credit. See the LICENSE file for details.